Wednesday, August 29, 2012

How to resolve error KFWITM217E Create Request Failed rc=209

After the installation of the Base ITM, and when you start TEPS, if you notice the KFWITM217E error ,  the problem could be that the TEMS support for the products was not configured.

So, to resolve this : go to the Base ITM Installer and execute this command.

./install.sh
and choose the Tivoli Monitoring Server Support ( Option '5')
Re-install ( if the prompt ask do you want to reinstall the SAME Version - say yes')
Seed it. ( accept this prompts during configuration )

Restart all the processes
This should resolve it.

Thursday, August 16, 2012

Starting DB2CC Control Center in Linux.

On a DB2 V9.5

Troubleshooting db2cc on a Linux server.

The db2cc is installed automatically when DB2 V9.5 is installed in the default /opt/IBM/db2/V9.5 folder. So, if you try to start it in a VNC session, then if you get this message.


That means the JDK_PATH is not set right.

This is how you check the path is correct or not.

Login to the db2instance
( su - db2inst1 )

db2 get dbm cfg  - look for JDK_PATH


If the path above does not have the JRE - then reset it to the correct JRE location  using this command.
( in my case - the JRE path was found in the below path )

Update it using the below command.


Validate it by running the  'get dbm cfg ' again


In the root window in VNC,  export the DISPLAY=<IPaddress>:0.0
cd to /opt/ibm/db2/V9.5/bin  (or wherever the DB2 is installed ) 
./db2cc
should launch the DB2 Control Center.

Friday, June 22, 2012

Changing VNC desktop to gnome-session& in xstartup

change the twm & to
gnome-session & in the xstartup file in .vnc folder
To start the vnc
vncserver

to stop
vncserver -kill :1

Saturday, May 5, 2012

SQL0970N The system attempted to write to a read-only file. SQLSTATE=5500

I got this message when I removed the earlier installed DB2 and installed V9.5  of DB2 and I wanted to create a WAREHOUS user  ( db2 create database WAREHOUS )

SQL0970N The system attempted to write to a read-only file. SQLSTATE=5500

Turns out that I did not have the write perms on the /tmp folder on my RHEL server where I was installing.

chmod ugo+w /tmp - did it.

Looking at the dbinst1/sqllib/db2diag.log - told something about the permission in that folder.


Thursday, May 3, 2012

Configuring DB2 on a Linux for Tivoli Enterprise Monitoring and Portal Server

[ Views and opinions are my own and does not reflect my employer IBM - there may be better ways to do this, but  this below worked for me ]

How to install DB2 Express on a Linux RHEL 32 bit.

Create a separate folder.
See that you have at least 900 MB free.
Untar this first in the new folder.
DB2_Exp_Ed_97_Linux_x86.tar.gz

Pre-reqs:
1. Check that the dasadm ( administration server ) is not running from an earlier installation.
it is usually in the /home/dasadm folder.
Stop it first.  /opt/ibm/db2/V9.x/das/bin/db2admin


http://publib.boulder.ibm.com/infocenter/db2luw/v9/index.jsp?topic=%2Fcom.ibm.db2.udb.admin.doc%2Fdoc%2Fr0002037.htm

If you do not - during installation - you will get this message

ERROR: ## call function cleanup_reg_list das crt dasusr1
DBI1103E  The Administration Server already exists.


2. Also, check that there are no users like itmuser, in /etc/passwd
3. cd /opt/ibm and check that there is no db2 folder
4. clean up any older db2 log files in the /tmp folder.
(5. /tmp has the rwx perms )


See that you have the xsession on a Linux server up and vnc to that server. 

Execute    db2setup

Things to remember - so make notes.
What was the instance name during creation : 

What was the password for dasusr1.
What was the password for db2inst1
What was the password for db2fenc1.


su - db2inst2
db2start -
ps -ef |grep db2 - there will be a few processes running
db2stop - all these should be down.
this should give an indication that the installation is good.


Uninstalling tips -
I had to  db2stop and then remove the folder /opt/ibm/db2
There was one nagging process db2fmcd - that would start over and over again - although I killed it, so ......
I had to search for this executable and do this 'db2fmcu -d ( this is an entry in inittab ) which keeps respawning.

Monday, April 30, 2012

Configuring the TEPS 'cq' on a Linux .

( Views are my own - and does not reflect that of my employer)

Some configuration steps I used when I was configuring the TEPS agent.
if the DB2 was configured with the defaults - then the itmuser passwd is itmpswd1.
This was on a RHEL 32 bit.
Important This is for the Embedded Database. and not the DB2 database.


Typically, I'd watch for the last step Installation Presentation part- where it says the status.


ITM Performance Analyzer - (ITPA) DB2 Configuration and it's effects?

Scenarios : Some snapshots of how a Performance Analyzer panel on the TEPS GUI shows up when the user clicks on the Performance Anayzer if the Database is configured ?

Good one :


Bad one :
If DB2 is not configured right :


How do we track and resolve this ?

I will cover this in my next blog ?

Friday, April 27, 2012

Tivoli Performance Analyzer - Domain Support installation and viewing it on the TEPS GUI.

(All views and opinions are mine and does not reflect my employer's point of view. )

IBM Tivoli Performance Analyzer agent is an intelligent tool that predicts the health of a system based on predictive analyses looking at the previous history of various factors like CPU, Disk and Memory amongst other parameters.
User will get an overview of how things will look down the road if the current state  or health continues - thereby giving an opportunity to correct it before server reaches a critical situation.

For more on the product please refer to http://publib.boulder.ibm.com/infocenter/tivihelp/v15r1/index.jsp
and select ' IBM Tivoli Monitoring'

In order the Performance Analyzer is fully effective and utilized, end-user has to install the ITPA support product as well as the Domain Support.

First the user would install the ITM 6.2.3 FP1 and choose the installation of the Performance  Analyzer agent,

After this - install and configure the Performance Analyzer Domain Support. product ( CI62LML )

User has to stop and reconfigure TEPS after this - to get the right task names correctly rendered on the TEPS GUI.

once done - user will run a <CANDLE_HOME>/bin/cinfo -t  (' the letter 't') and view the results and note that it will list the Performance Analyzer ( pa ) and the rest of the domains support ( p0..p6 ) are installed.


Thursday, April 5, 2012

Provisioning Virtual Images in Smart Cloud Provisioning.


IBM recently released the Smart Cloud during the Pulse 2012 and I got a sneak preview of the application under the hood. I wont get into the marketing details  here  -rather into some technical of the product, and how easy it is to create some instances in the product.
Some Snapshots are included here.

First you would login to the SCP user interface and go thru first few steps as indicated here to create the instances.


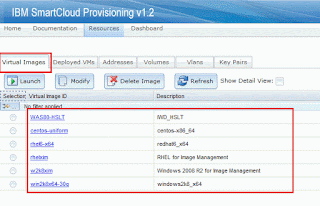
Click on Virtual Images and you will see the list of available Images that are offered to you.
You have to select an image and click on Launch, indicate the number of instances you need.


Once this is done - you see them in the Deployed VMs tab.


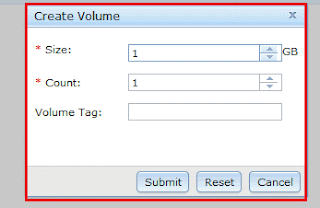
you can attach storage to it -once have created the instance of this image.


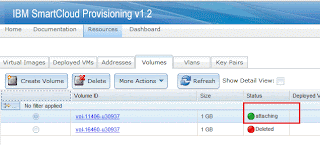
Once storage is created - you have to attach it to a deployed VM


Now you have an instance with the storage attached.

the Login procedure is simple.

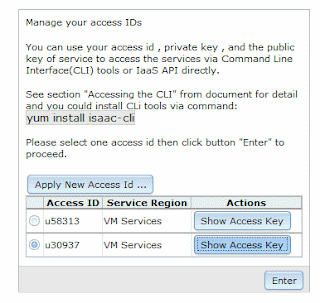
just download the private key from the SCP portal and download it


Get the IP address of the newly created instance.


Get the IP address of the newly created instance.


ssh -i <private.key > IP address of the newly created instance to login.

This should get you started.

As to how to create an instance from an image - will be covered in upcoming blogs.


Provisioning Virtual Images in Smart Cloud Provisioning.


IBM recently released the Smart Cloud during the Pulse 2012 and I got a sneak preview of the application under the hood. I wont get into the marketing details  here  -rather into some technical of the product, and how easy it is to create some instances in the product.

Instances in this context means servers on a virtual environment.

Some Snapshots are included here.

First you would login to the SCP user interface and go thru first few steps as indicated here to create the instances.


Click on Virtual Images and you will see the list of available Images that are offered to you.
You have to select an image and click on Launch, indicate the number of instances you need.
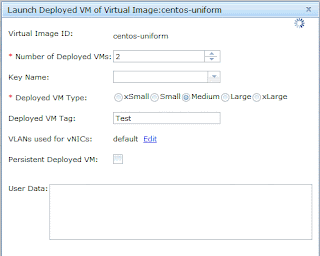


Once this is done - you see them in the Deployed VMs tab.
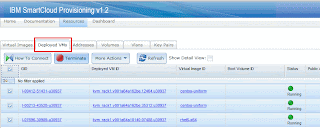


You can attach storage to it -once have created the instance of this image.
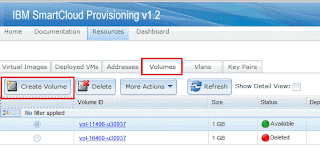


Once storage is created - you have to attach it to a deployed VM.
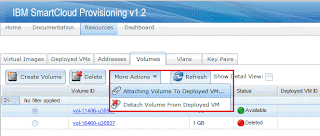


Now you have an instance with the storage attached.

The Login procedure is simple.

just download the private key from the SCP portal and download it
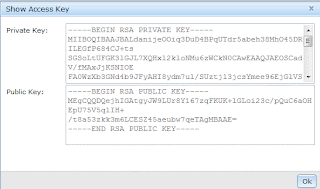

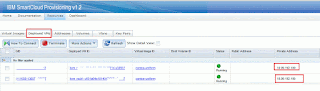
Get the IP address of the newly created instance.


Get the IP address of the newly created instance.


ssh -i <private.key > IP address of the newly created instance to login.

This should get you started.

As to how to create an instance from an image - will be covered in upcoming blogs.

Tuesday, March 13, 2012

Starting WebSphere sMash on Windows 7. UnsatisfiedLinkError, ZSO could not be located ...arch=x86_64

( All opinions are my own and does not reflect my employer's point of view. There could be better ways of doing stuff than written below, but what I have written below got me working again)


The WebSphere sMash is an IBM Application server that helps in building web applications faster, and lets users concentrate on writing business logic. More on this can be found at http://www.projectzero.org/


Having been used to running this on Windows XP -32 bit, when I was working on sMash - I had to face some challenges when I migrated the WebSphere sMash to Windows7 ( yes, I got a new Laptop running Windows 7)
So, when I tried to start up WebSphere sMash - it would not come up.
That's when I realized that  I needed to do some digging up.

My blog here says about how to start the sMash on Windows 7 OS.
Basically,you need to be pointing to the 32 bit JVM in order to get this right.  Once you initialize and also reconfigure the resolved. properties -then the application  should start up fine.


Wednesday, March 7, 2012

Authoring fixlets - Some Search Patterns in Relevance.

( All opinions are my own, and does not reflect my employer.)
 Ramblings on how to create some fixlets on BigFix.

Background: Big Fix is an IBM application used to deploy patches, upgrade or install rules and can monitor servers/clients that needs this patch - It will automatically inform the client and the client will do a pull (versus a push of the patch from the server ) which is more effective.

Up until IBM bought this, it was called Big Fix and now it is Tivoli End Point manager.

A fixlet is a composition of Rules, Actions and Relevance that describes the patch or an install on the client.

Once this fixlet is deployed with the above, TEM will constantly monitor the clients and deploy them.
My blog here shows a sample on how to write fixlets using different relevance rules on TEM ( Tivoli End Point Manager -Previously called Big Fix )

Note : I am only showing the different relevance rules that can possibly be applied to check if the rpm is present.

Note : Here I am interested in "expect"

Snapshot shows how a relevance is written - that identifies the clients as Linux:


Picture :
One other way to deploy is to identify a specific server on which the package will be deployed.


Picture 3:


Picture 4: Once this is identified - User will write appropriate action scripts to deploy the package.

Creating a fixlet to identify deployment of NMA agent from Big Fix Server.

All opinions are my own and does not reflect that of my employers.

NMA is the network montoring agent - an agent developed by IBM that helps in detection of servers on the network and report on their characteristics.

Big Fix is an IBM Application that is being used to detect clients that need patches/ installation of software or bringing servers upto sync on new releases.
Big Fix is also called Tivoli Endpoint Manager after IBM bought it over.
So references to TEM or Big FixServer are one and the same.

In this blog I will briefly describe how to deploy the NMA agent on remote clients.
I'd assume that the the agent is already available on the Big Fix server and can be used to deploy.

Create New Fixlet. 

Creating the relevance rules - this means that the relevance rules have to be true in order for the agent to be deployed.

 
Create a script that will be executed on the remote client once the relevance rule is satisfied.

A sample Relevance Rule to check if the Tivoli NMA agent is installed or
not in Big Fix.
Relevance:

Action :

How to Unistall and Install Big Fix Server on Windows.

References to Big Fix means - IBM Tivoli Endpoint Manager.

Here I talk about my experiences on removing and reinstalling the Big Fix Server that was already installed on the Windows platform and things I learnt in the process.

Very Important - Just do not remove the Big Fix from the Add/Remove programs - how ever... Uninstall both the Big fix and the Microsoft SQL server folders and application from the Add/Remove programs.

One other thing I noticed was, the Tivoli Endpoint Manager (Big Fix Server) after installation did not recognize the older Clients ( in my case  the Unix clients) that were recognized before the removal, so I had to uninstall the clients manually in order for the TEM server to recognize them.
rpm -e BESAgent and let the TEM Server rediscover it again.

Picture : Uninstall of the application in progress:


Picture :
Removal of the folder/directory structure - in other words - cleaning out.


Since I was experimenting with this - I had to select the Evaluation Version.


I accepted the defaults - no changes here.


Picture :
Set password for the TEM administrator.
 

Picture:


Picture below : If this happens it means the Microsoft SQL Server was not removed completely, this leads to the TEM failure. So in this case I'd go back and clean out the SQL installation - both from the Add/Remove and also clean out the SQL directory folder structure and then restart all over.
 ( Do not abort the installation , however finish this installation - remove, clean out and reinstall )


Hope this helps who is going thru similar situation.