Monday, June 22, 2015

Viewing Reports on Service Engage APM subscriptions.

How to view Reports from the APM console :

To get started using Service Engage - logon to
https:// www.ibmserviceengage.com/
and create a subscription.
Request for Reports to be added to the subscription .
Once the reports are added and you have downloaded the agent ( see my other blogs here to see how to download agents ) , you can view the reports.


In this blog - I will talk about how to view the reports for the Linux OS agent- assuming that the subscriber has subscribed or requested for the Reports component to be added to the  subscription.

Open the Service Engage APM console and click on the "Actions" -> on the upper right.

In the " Actions" -> Click on " Launch to Reports " ->  Click on "All my reports ->  

( If the All my reports does NOT show up , then it means -you have either a) NOT requested for the Reporting component , or the OS agent is NOT downloaded, installed and started on the remote agent.
If that is the case - go back and request the subscription, download the agent, configure and start the OS agent- only then will the Reports drop down will be visible.)

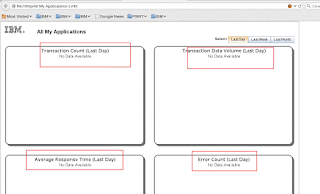
This should download the MHT  (Web Archive Format Files ) and when opened - will render the page as shown below.

The MHT file can be opened in both the FF and IE. ( For Firefox you will need to install the UnMHT  Add-on)


This will download the reports. which  can be viewed.


Shashi Kiran

Looking up OS Agents on APM ( Application Performance Monitoring )

This tutorial is about - how to lookup the OS agent that you have installed ( described in my earlier email) on the Service Engage APM GUI ( also called as the APM console )

The remote agents downloaded and installed on the Remote linux servers would have already been configured to point to your  APM Service Engage subscription.
( see my earlier blog on how to install and start the remote OS agent ).

Here I will talk about how the remote agents show up on the APM UI ( also called as APM Console ) after the remote agents are started.

The operator does not have to do any thing, post installation and startup of the agents, and they will automatically show up on the APM console.

Below, you will see that the remote OS agent installed on a Linux server "nc184107" is visible on the console.


Shashi Kiran

How install OS Agents from IBM Service Engage - and starting it.

After successful creation of a Application Performance Monitoring subscription from Service Engage
https://www.ibmserviceengage.com/


The user is prompted with an option to download the agents to be installed on the remote server.
Here, below I will choose to download the OS agents, and scp it to the remote Linux server where
I will untar and run the install APM Agents.sh script.

See notes below.

https://www.ibmserviceengage.com/


You would need to have an IBM Id to start creating one.

Once the appropriate subscription  is created and in this case - I will add the  Performance Management Component


After successful creation - you will be able to download the agents to be installed on the Remote agents.


Below is the extracted contents, and running of install script installAPMaasAgents.sh script.

[root@nc184107 IAPMaaS_Agent_Install_8.1.1]# ./installAPMaaSAgents.sh
 
The following products are available for installation:
 
    1) Monitoring Agent for Linux OS
    2) Monitoring Agent for Ruby
    3) Monitoring Agent for MySQL
    4) Monitoring Agent for MongoDB
    5) Response Time Monitoring Agent
    6) Monitoring Agent for WebSphere Applications
    7) Monitoring Agent for PHP
    8) Monitoring Agent for PostgreSQL
    9) Monitoring Agent for Python
   10) Monitoring Agent for Linux KVM
   11) Monitoring Agent for Tomcat
   12) Monitoring Agent for Node.js
   13) Monitoring Agent for DB2
   14) Monitoring Agent for Oracle Database
   15) Monitoring Agent for SAP Applications
   16) Monitoring Agent for DataPower
   17) Monitoring Agent for VMware VI
   18) Monitoring Agent for HTTP Server
   19) Monitoring Agent for Websphere MQ
   20) Monitoring Agent for IBM Integration Bus
   21) Monitoring Agent for JBoss
   22) Monitoring Agent for WebSphere Infrastructure Manager
   23) all of the above
 
Type the numbers that correspond to the products that you want to install. Type "q" to quit selection.
If you enter more than one number, separate the numbers by a space or comma.
 
Type your selections here (For example: 1,2): 1
 
The following agents will be installed:
 
    Monitoring Agent for Linux OS
 
Are your selections correct [ 1-Yes, 2-No; default is 1 ]? 1
 
Please specify the agent home (default: /opt/ibm/apm/agent):
 
The agent will be installed in /opt/ibm/apm/agent
 
Do you accept the license agreement(s) found in the directory /root/Desktop/IAPMaaS_Agent_Install_8.1.1/licenses?
 
Please enter [ 1-to accept the agreement, 2-to decline the agreement ] : 1
 
User has accepted the license agreement(s).
 
    Monitoring Agent for Linux OS will be installed.
 
Running ./os-agent.sh install
Checking product prerequisites before installation. You can disable this check by setting environment variable SKIP_PRECHECK
Setting Prerequisite Scanner output directory to user defined directory: /opt/ibm/apm/agent/logs/prereqchecker/20150622_031906

IBM Prerequisite Scanner
     Version: 1.2.0.15
     Build  : 20141127
     OS name: Linux
   User name: root
 
 Machine Information
 Machine name: nc184107
 Serial number:  VMware-42 23 c4 e2 40 6d 5e 9a-1a 2c a9 b1 d3 ce 67 19
 

Scenario: Prerequisite Scan


KAX - IBM Tivoli Monitoring Shared Libraries [version 06350900]:

KGS - IBM GSKit Security Interface [version 08005036]:

KLZ - Linux Monitoring Agent Prerequisite Checker [version 06350900]:


Overall result:   PASS  

Detailed results are also available in /opt/ibm/apm/agent/logs/prereqchecker/20150622_031906/result.txt

Installing core framework (common components)
Starting installation. Log file is /opt/ibm/apm/agent/logs/install_20150622-032242.log.
Installing components.
IBM Monitoring Shared Libraries [version: 06350900]
IBM GSKit Security Interface [version: 08005036]
Installation successfully completed.

Installing agent
Starting installation. Log file is /opt/ibm/apm/agent/logs/install_20150622-032249.log.
Installing components.
Monitoring Agent for Linux OS [version: 06350900]
You can secure your installation by running /opt/ibm/apm/agent/bin/secure.sh tool. Consult the documentation for details on how to run it.
Automatic start at system initialization has been configured.
Automatic stop at system shutdown has been configured.
Installation successfully completed.

Agent installation completed. Agent was configured and started using default configuration settings.
End running ./os-agent.sh install
 
 
#####################################################################################################################
The following agents have been installed successfully into the directory /opt/ibm/apm/agent:
    Monitoring Agent for Linux OS                 status: agent started
 
For any agent that is started, the agent is configured with the default settings.
 
Use the following commands to manage each installed agent:
    Monitoring Agent for Linux OS                 /opt/ibm/apm/agent/bin/os-agent.sh start or stop or status or uninstall
 
The install log file is /opt/ibm/apm/agent/logs/APMaaSAgents_install.log.
 
Performance Management Documentation URL:
https://www.ibm.com/developerworks/community/wikis/home?lang=en#!/wiki/IBM%20Application%20Performance%20Management%20as%20a%20Service/page/APMaaS%20Documentation
 
#################################################################


[root@nc184107 IAPMaaS_Agent_Install_8.1.1]# /opt/ibm/apm/agent/bin/os-agent.sh start
Processing. Please wait...
Info: The "Monitoring Agent for Linux OS" is already running.


Verify that the processes are running :

[root@nc184xxx bin]# ps -ef |grep lz
root     11021     1  2 03:44 pts/3    00:00:00 /opt/ibm/apm/agent/lx8266/lz/bin/klzagent
root     12470  5582  0 03:44 pts/3    00:00:00 grep lz


In my next blog - I will tell about how to view this OS Agent on the APM subscription dashboard.

Sunday, June 21, 2015

Cell phone position using its' accelerometer, displayed thru Bluemix IoT's MQTT Foundation.

A small experiment I tried where I entered Bluemix's URL on my cell phone and each time there was a movement on my cell.
I'd notice the different vibrations on the URL.

To do this -
First I went to https://console.stage1.ng.bluemix.net/

logged in with my IBM Id.
Clicked on IoT solutions.
Clicked on "Try it out" button


Enter an unique name 'RaspSPi' and 4 digit code  xxxx in the Device Name and the 4 digit code window and clicked on Go Play"

and immediately  got an URL.

http://iot-demo.mybluemix.net/device/RaspSPi 

I entered this URL on my Micromax Canvas A1 smartphone which asked me to validate my 4 digit code.
 
At the same time - out of curiosity I entered the same URL on my Lenovo Laptop and this is what I got.

Some data both on the web on my smart phone , as well as on the browser on which I opened the above link.

Observe the "Vibration" "Motion and other stats from my cell being displayed on the URL.

This is what was happening.

and I cut and paste this from the IoT's web site"
-- Cut and Paste ---
accelerometer data from your phone is being sent to the IoT Foundation.

A Bluemix app is using this data to mirror your movements — go on, try moving your phone.

-- Done -- Cut and Paste--


This below is when I laid my Cell phone at 90 degrees.


Below, is when I moved my cell phone in standing position.


Below , when I moved my cell phone to a slant position.


Shashi Kiran
Operations Support - Bluemix and Service Engage

IP address allotted to Raspberry Pi , when connected to my network wire less router.

The Raspberry  Pi IoT has the ability to connect wireless to the internet.

Here I have my R Pi - Wifi -adapter inserted into the device's USB port, and it communicates to my home network wireless Netgear Router.
This set up is in my home.

See the IP address from the Raspberry Pi connected to IoT device 192.168.1.4 - The display is my home TV connected via the USB cable to the R Pi.

(See attached file: IMG_20150618_204220.jpg)(See attached file: IMG_20150618_204226.jpg)(See attached file: IMG_20150618_204235.jpg)

Shashi Kiran